Everything you need to know about making focaccia at home
a permanent home for all things focaccia
In the past year, I’ve shared many different focaccia flavors. So, it seemed only right to give my classic, tried, and true base dough a permanent home here. I initially developed this as a base recipe for pan pizzas, but since my frozen pizza days ended (R.I.P. Grateful Pizza), I’ve used it mostly for Scratch Made, offering a different focaccia flavor every week. Over the last few years, I’ve definitely put in my 10,000 hours working with this dough and learned a few things along the way.
Below, you can find everything you need to know about making focaccia: the recipe, ingredients, equipment, step-by-step photos, and answers to the questions I get asked most frequently to help you troubleshoot any problems you might face along the way. Whether you’re new in your focaccia journey or have made it many times, my hope is that this post can be your one stop shop for all things focaccia. Please leave any additional questions you may have in the comments below so they can live here as well!
The recipe:
Equipment:
medium mixing bowl
bowl scraper
bench scraper
kitchen scale
kitchen aid mixer with dough hook (optional)
1/2 sheet tray
1/4 sheet tray
1/8 sheet tray
baking rack
Ingredients:
bread flour
olive oil
fast acting yeast
salt
Maldon salt
For the visual learners:
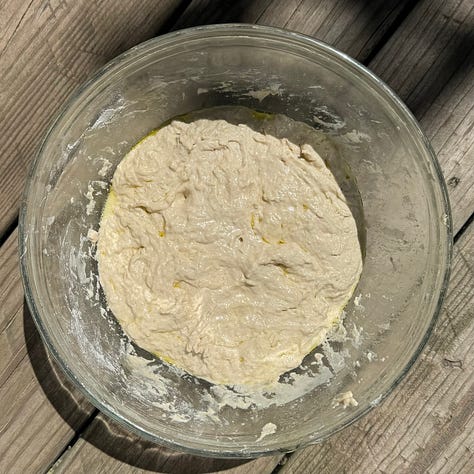
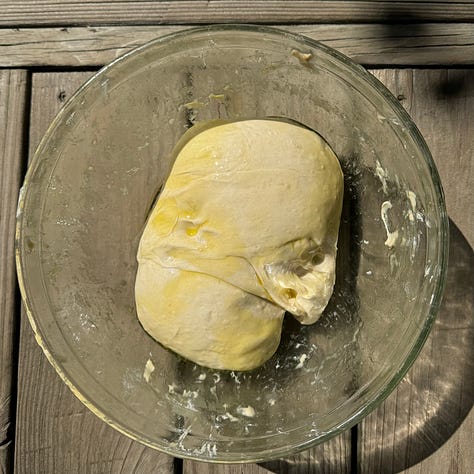
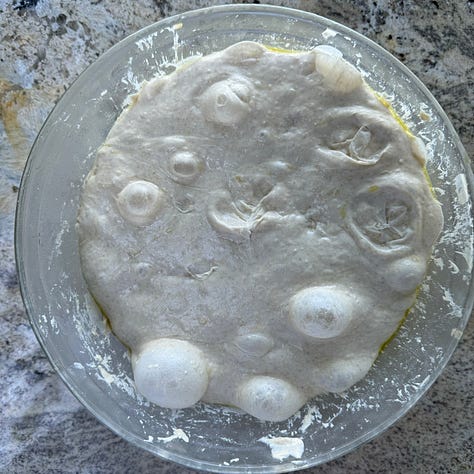
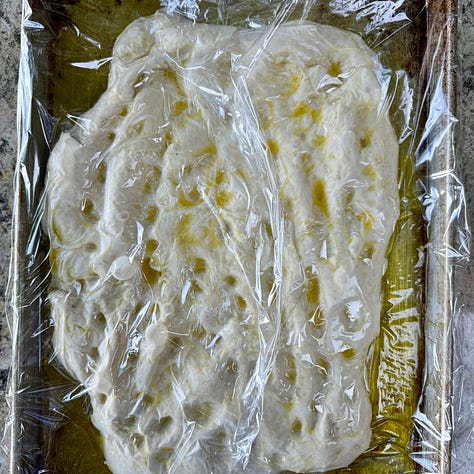
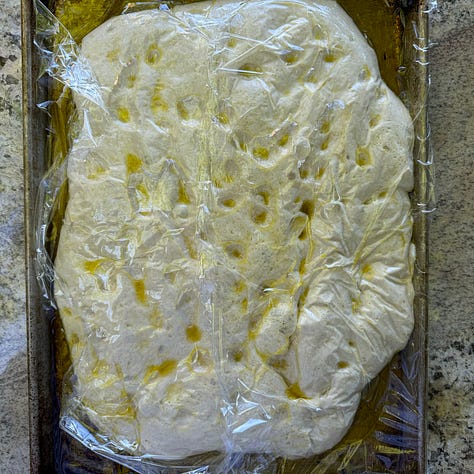
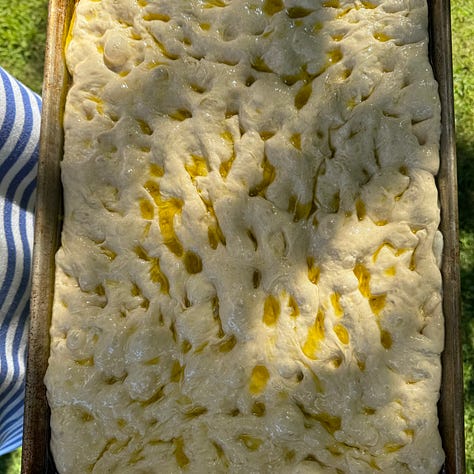
Commonly asked questions:
What kind of flour should I use?
Bread flour works best and will yield a chewier, more elastic dough.
Can I use all-purpose flour?
Yes, the same recipe works for all-purpose flour. You might find that the dough feels slightly dryer when using all-purpose flour instead of bread flour.. If using all-purpose flour, I recommend sprinkling a little bit of water (roughly 1 Tbsp) at step 3 before adding the salt and yeast.
What trays do you use in your videos?
For Scratch Made, I use 1/8 sheet trays (10.1”x7”x1.1”). These babies.
How many grams of dough per tray?
When I’m using the 1/8 sheet trays, I use 375g-475g of dough. When I use a 1/2 sheet tray, I use all the dough, and for 1/4 sheet tray, I use half the dough.
How much olive oil should I use?
A lot! Unlike other focaccia recipes, this one does not use olive oil in the dough itself. Rather, this recipe relies on a generous amount of olive oil, to almost fry the dough in and impart a rich flavor. For a 1/2 sheet tray, I use about a 1/4 cup of olive oil to coat the pan. I also top the focaccia with more olive oil, which gives it a glossy appearance and helps it brown.
Can I use a neutral oil or butter instead of olive oil?
Technically, you can. However, olive oil is the only flavor component in the dough. So, without it, your dough won’t have that richness associated with focaccia. I have experimented and I’ve found that neutral oil works but does not brown as much as olive oil will. Butter will work, but the resulting focaccia has a matte appearance and doesn’t brown as much as a focaccia made with olive oil. In short, you can but the result is sub-par.
How do you decide whether to mix ingredients in with the dough or sprinkle them on top?
This takes a little bit of trial and error. However, I tend to mix ingredients in if they burn easily, like leeks, onions, garlic, or sun-dried tomatoes. Sometimes, I also like to mix ingredients into the dough rather than using them as toppings to stretch them. For example, I love olive focaccia, but it requires a lot of olives for the flavor to really come through when using them as a topping. So, sometimes when I’m making olive focaccia for Scratch Made, I’ll finely chop the olives and heat them with olive oil, herbs, and garlic so that all the flavors infuse into the oil. Then, I mix that into the dough so that the flavors are infused into the dough as well. That allows me to get more flavor with less. I tend to top the focaccia with ingredients when they are cut into large chunks, so they brown without burning.
How do I get the focaccia deeply golden brown?
Fat, time, and temperature. Be sure to use a lot of olive oil and leave it in the oven long enough. I find that home bakers tend to under bake their focaccia. It should get deeply golden brown if you leave it in long enough. If your oven runs cold or doesn’t have a powerful fan, I would preheat the oven to 500 degrees F and then lower it to 425 degrees F before baking. If you are doing all of this and still getting a light loaf, you might be over-proofing the dough. Over-proofed dough tends to get less color.
Do I have to proof the dough overnight?
No. Proofing overnight leads to the best outcome in terms of flavor and texture. However, If you want to mix, proof, and bake the dough all in one day, you should proof it for about 5 hours on the counter. The resulting focaccia will be less flavorful than if you let it proof overnight.
How can I tell that my dough has proofed enough? How can I tell if my dough has over-proofed?
Your dough has proofed enough when it has puffed up and is almost doubled in size. However, the dough should still bounce back somewhat after you dimple it. If the dough has over-proofed, it will deflate when dimpled. It will still be tasty, it just won’t get as brown, and the texture will be more dense.
If you have any remaining questions, please share them with the class!
Tried and True Focaccia
Ingredients:
555 g water (room temperature)
750 g bread flour
7 g active dry yeast (or 4.8 g instant dry yeast)
10 g salt
90 g extra virgin olive oil
Step 1:
If using a stand mixer, attach your bread hook. First, add the water to the bowl. Then, add the flour.. Mix on a low setting until the flour and water are just combined. If using your hand, add water and then flour into a medium-sized mixing bowl. Use your hand to pinch the flour and water together until just combined. Your dough is mixed enough once it has a shaggy consistency.
Step 2:
Cover the bowl with plastic wrap or a kitchen towel. Allow it to rest for one hour (but you could rest for as little as 30 minutes). This allows the dough to fully hydrate before adding the salt and leads to a better texture.
Step 3:
After the dough has rested, sprinkle the yeast and salt evenly over the dough. If using a stand mixer, mix for 3 minutes on medium speed or until everything is fully incorporated. If using your hand, this will take closer to 5 minutes to thoroughly mix. Make sure that there aren’t pockets of unincorporated salt and yeast. Remove the dough from the bowl with a bowl scraper and drizzle a generous amount of olive oil into the bottom of the bowl. Return the dough to the bowl or an oiled baking dish.
Tip: Proof the dough in a vessel that is the same shape as your baking dish. For example, if you plan to bake in a rectangular baking sheet, you should allow it to proof in a rectangular dish. If you are going to bake the focaccia in a round cast iron pan, you should allow it to proof in a bowl. This will make it easier for the dough to fill the baking vessel.
Step 4:
Fold the dough into thirds like a letter and then flip the dough fold-side down. Cover again and allow it to rest on the counter for 20 minutes.
Step 5:
After 20 minutes, fold into thirds again and turn the dough fold-side down. Cover with a towel and allow the dough to rest for 20 minutes. Repeat this two more times, for a total of 60 minutes and 4 folds, before putting the dough in the refrigerator overnight to retard.
The process will go like this:
Fold into thirds and cover
Allow to sit for 20 minutes
Fold into thirds and cover
Allow to sit for 20 minutes
Fold into thirds and cover
Allow to sit for 20 minutes
Fold into thirds a final time and cover. Place dough, completely covered, in the refrigerator overnight. (I find that plastic wrap works best to cover overnight. However, a kitchen will work too!).
Step 6:
The next day, take your dough out of the refrigerator and generously coat a baking dish with olive oil. This amount of dough works well with a half sheet tray (18”x13”) or divided between 2 quarter sheet trays (9.5”x13”). For a half sheet tray, pour about 53 g grams of the oil into the tray and reserve the remaining oil to drizzle on top of the dough. If using 2 quarter sheet trays, drizzle about 26 g in each and reserve the remaining oil for topping the dough. Place the dough in the baking dish and dimple it to spread it out as much as possible before drizzling with the remaining olive oil and covering loosely with plastic wrap. Allow to proof one last time on the counter for 60 to 90 minutes. The amount of time will depend on the temperature of the room. However, you will know it’s ready when the dough puffs up and is roughly doubled in size.
Step 7:
Place your oven rack in the center. For a convection oven, preheat to 425°F . If you do not have a convection oven, preheat to 500°F and lower to 425°F right before putting your dough in.
Step 8:
When the dough seems ready to bake, dimple the surface by lightly pressing your fingertips into it, spreading your fingers out as you press down. More bubbles should form as you do this. Top with whatever toppings you’d like or simply with flaky salt like Maldon. Drizzle, yet again, with olive oil and place on the center rack to bake for 15 minutes. Rotate the pan and bake again for another 15 minutes. Rotate it and bake again for another 15 minutes. The exact amount of time will vary depending on your oven, but it will take roughly 30-45 minutes. Remove when the bread is a deep golden brown. Allow to cool slightly before slicing and serving. For a crispier crust, transfer to a baking rack to cool before enjoying.


This is my go-to focaccia recipe now. It has turned out pretty much perfect every time, no matter what add-ins or toppings I use! Thank you so much!
Another sincere thank you! I love your blog and truly appreciate this post and the addition of the pdf recipes. Thanks!